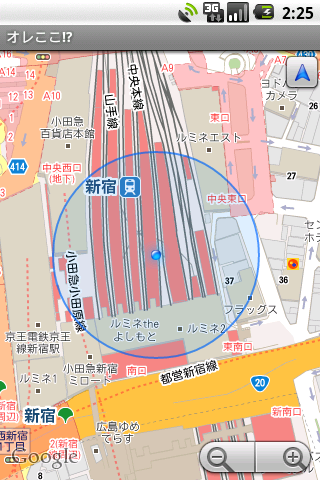
Android で MapView へ現在地に青い円を描画する
昨日のエントリにて、Android で納得のいく位置情報取得が可能になったので、MapView へ現在地を表示することが可能になりました。ただし GPS にしろ Wi-Fi を使った場合にしろ位置が多少ズレます。Google マップアプリで見ても同様なのでこれは仕方ないのですね。
さて、ズレるのは仕方ないので位置情報の精度誤差を表す青い円を描画してみたいと思います。やり方ですが、Location クラスは精度誤差をメートル単位で持っているので、これを活用して現在地表示用のオーバーレイの draw にて実装してみます。
以下がコード例です。
MyLocationMapActivity + MapView + BetterLocationManager + CurrentLocationOverlay
public final class MyLocationMapActivity extends MapActivity {

	private MapView mapView;
	MapController mapController;

	SimpleLocationManager simpleLocationManager;
	CurrentLocationOverlay currentLocationOverlay;

	@Override
	protected void onCreate(final Bundle savedInstanceState) {
		super.onCreate(savedInstanceState);
		setContentView(R.layout.main);

		mapView = (MapView) findViewById(R.id.map);
		mapController = mapView.getController();

		simpleLocationManager = new SimpleLocationManager((LocationManager) getSystemService(LOCATION_SERVICE));

		// オーバーレイを構築します。
		final List<Overlay> overlays = mapView.getOverlays();
		currentLocationOverlay = new CurrentLocationOverlay();
		overlays.add(currentLocationOverlay);
		// TODO: 他にもオーバーレイを使用する場合は、ここにコードを記述します。
	};

	(中略)

	final class CurrentLocationOverlay extends ItemizedOverlay<OverlayItem> {

		private Location currentLocation;

		/**
		 * デフォルトコンストラクタです。
		 */
		public CurrentLocationOverlay() {
			super(boundCenter(getResources().getDrawable(R.drawable.blue_dot)));
			populate();
		}

		@Override
		protected OverlayItem createItem(final int i) {
			return new OverlayItem(new GeoPoint((int) (currentLocation.getLatitude() * 1E6), (int) (currentLocation.getLongitude() * 1E6)), null, null);
		}

		@Override public int size() { return currentLocation == null ? 0 : 1; }

		@Override
		public void draw(final Canvas canvas, final MapView mapView, final boolean shadow) {
			if (shadow) {
				return;
			}

			// 精度誤差を表す円を描画します。
			if (currentLocation != null && currentLocation.hasAccuracy()) {
				// 現在地から経度を加算した位置との距離を求めます。
				final double testLongitude = currentLocation.getLongitude() + 0.01;	// 経度 +0.01 度は赤道付近でおよそ 1.1km なのでこれより小さい値を使用すると描画性能に影響すると思われる。(大きい値は問題ないはず)
				float[] results = new float[1];
				Location.distanceBetween(currentLocation.getLatitude(), currentLocation.getLongitude(), currentLocation.getLatitude(), testLongitude, results);

				final GeoPoint geoPoint = getItem(0).getPoint();
				final GeoPoint testGeoPoint = new GeoPoint(geoPoint.getLatitudeE6(), (int) (testLongitude * 1E6));

				// 現在地と経度を加算した位置とのピクセル数を求めます。
				final Projection projection = mapView.getProjection();
				final Point point = projection.toPixels(geoPoint, null);
				final Point testPoint = projection.toPixels(testGeoPoint, null);
				final int pixels = Math.abs(point.x - testPoint.x);

				if (pixels > 0) {
					// 半径ピクセル数 = 精度誤差(メートル) * 現在地と経度を加算した位置とのピクセル数 / 現在地から経度を加算した位置との距離(メートル)
					final float radius = currentLocation.getAccuracy() * pixels / results[0];
					// 円を描画します。
					final Paint paint = new Paint(Paint.ANTI_ALIAS_FLAG);
					paint.setStyle(Paint.Style.FILL);
					paint.setColor(Color.argb(0x22, 0x33, 0x99, 0xFF));
					canvas.drawCircle(point.x, point.y, radius, paint);
					paint.setStyle(Paint.Style.STROKE);
					paint.setColor(Color.argb(0xAA, 0x00, 0x66, 0xFF));
					canvas.drawCircle(point.x, point.y, radius, paint);
				}
			}

			super.draw(canvas, mapView, shadow);
		}

		public void setCurrentLocation(final Location currentLocation) {
			this.currentLocation = currentLocation;
			populate();
		}

	}

	final class SimpleLocationManager extends BetterLocationManager {

		(中略)

		@Override
		protected void onUpdateLocation(final Location location, final int updateCount) {
			if (updateCount == 0) {
				// TODO: 必要があれば、ここに処理を記述します。
			}
			currentLocationOverlay.setCurrentLocation(location);
		}
	}

}
昨日のコードに以下の部分を追加/変更しています。
- MyLocationMapActivity.onCreate で MapView を findViewById するコードを追加。
- MyLocationMapActivity.onCreate でオーバーレイを構築するコードを追加。
- CurrentLocationOverlay クラスをドカっと追加。(R.drawable.blue_dot というリソースは適当に青い点画像などを用意して下さいませ。)
- SimpleLocationManager.onUpdateLocation の最後で CurrentLocationOverlay へ現在地を設定するようコードを追加。
これで Google マップアプリと同じ大きさ(正確には精度誤差の大きさ)で青い円が出ているはずです。
青円の半径を求めるところはあまり得意なところではないので突っ込み歓迎です。
ご存知の方がほとんどだと思いますが、Overlay を作る場合、Overlay 用のデータを設定した後やコンストラクタなどで populate して描画に備えられるようにする必要があります。(いくつかの blog で populate にまったくふれずに Overlay を紹介していたのが気になったので...)
